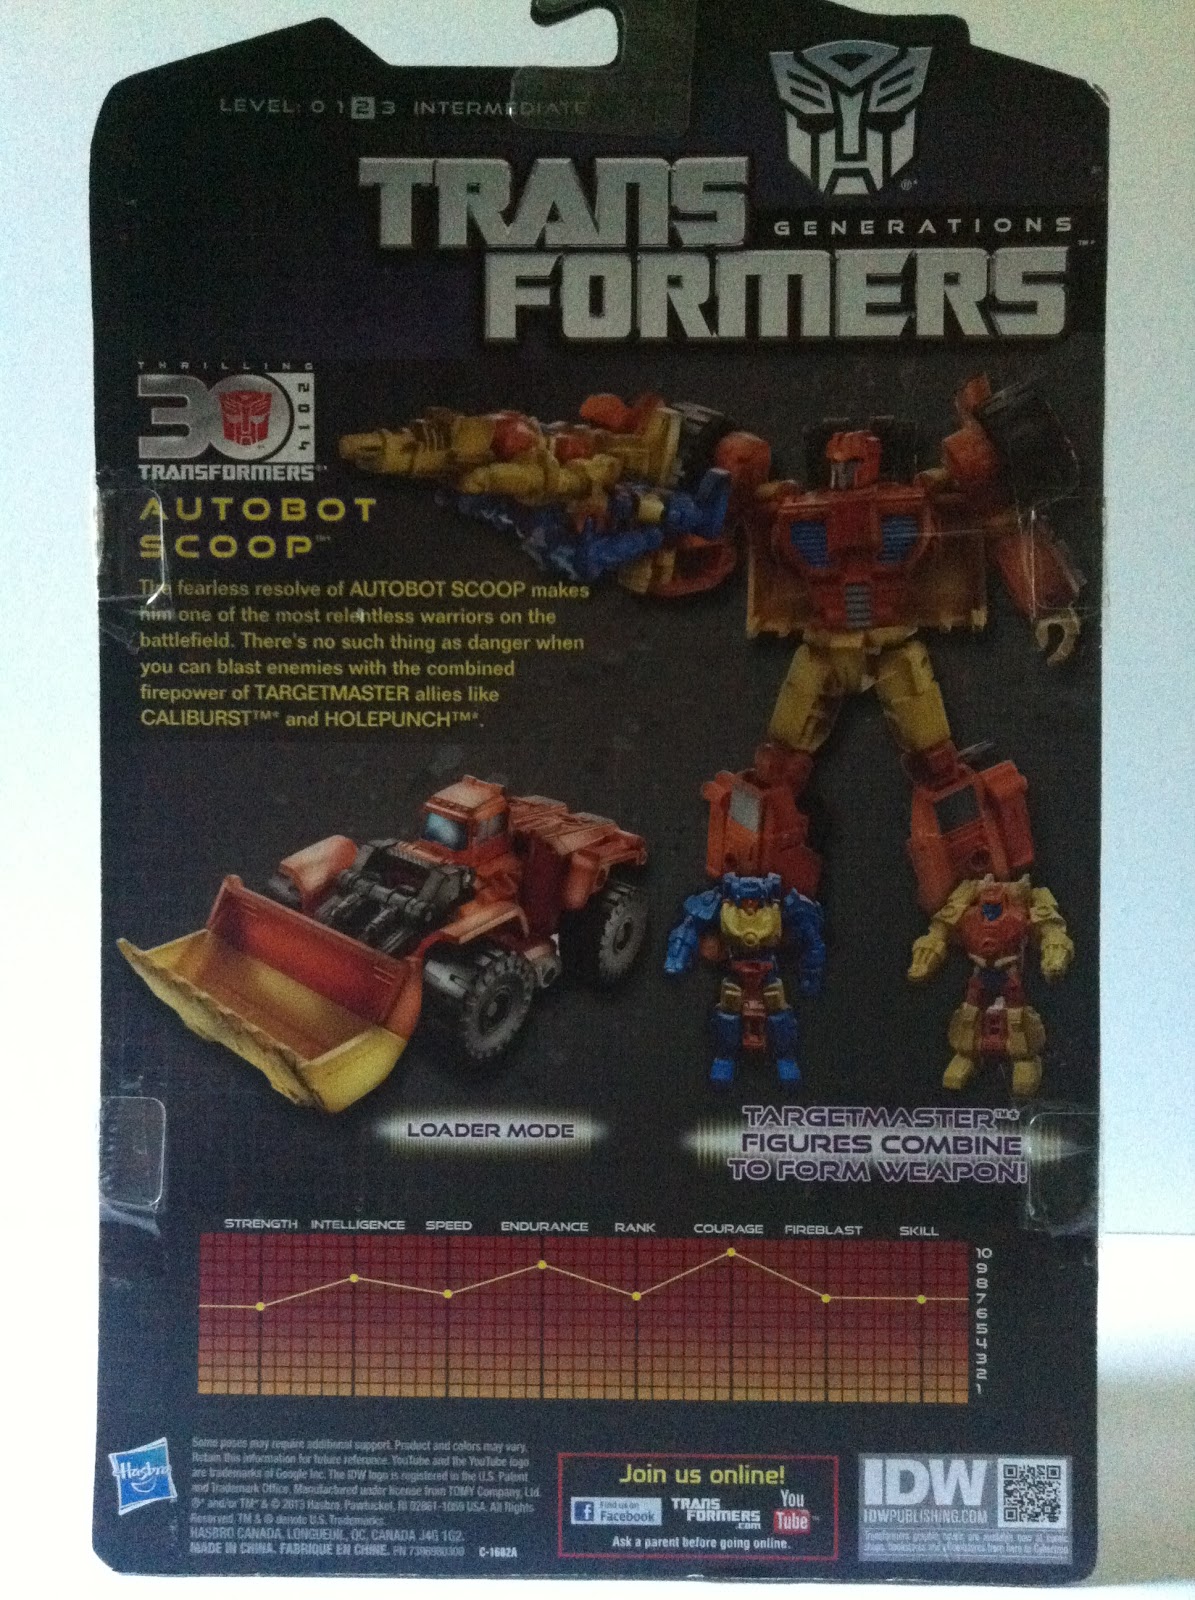
Monday, 28 July 2014

Vinyl is Retro....Once again!

In a previous review I discussed Series One of The Loyal Subjects vinyl figures. Since that review was first posted I have added to the collection by finding Megatron, Optimus Prime, and Starscream (via a trade with Cybertronian Beast go check out his YouTube channel) and I am still impressed with them. Recently my local comic book shop had the newly released Series Two. Only seeing photos from conventions they appeared to be similar to Series One and so I had no hesitation at all in my mind in grabbing a couple.

With their first release there were a couple of items that could be improved on and to my surprise they have and I will first start with the packaging. With the first release the box was perfect for the G1 feel but with some figures once their accessories were added to them, say their wings in the case of the Seekers, you were not able to place them back inside. The boxes in Series Two are larger and yet they still give the impression of the classic G1 package albeit with a more of a decided Decepticon look. Still a blind pack with no part or product numbers on the outside, so it is a complete gamble on which figure you receive. The box art does include drawings of the figures that are available. In case you are wondering, in Series Two you have Slag, Shrapnel, Thrust, Ramjet, Shockwave, Mirage, Sideswipe and Prowl (the highlighted ones I received) Along with 3 mystery figures that are scattered throughout the cases available, one of which is a talking Optimus Prime.


Once the box is opened you are greeted with a foil bag further adding to the mystery of these blind boxes. Rip open into that foil and you finally get your first look at the figure you received. Inside that bag you also have any additional pieces and weapons along with a G1 style techspec card. When you first remove the figure from its foil prison you start to see the list of improvements that were made after Series One.

The first will be the improvement in poseibility. The head, waist, hips, shoulders and hands are on a ball and socket joint. When I first removed Prowl from his packaging the socket on the waist had popped apart but it was very easy and simple to pop back into place, but be a little careful as they joints can weaken. Those socket joints allow for greater movement over Series One. They do have joints in their waist, neck, shoulders and wrists but overall those joints they are more or less a few pieces of vinyl blocks. Series Two in my eyes would be considered the Generations toyline upgrade to the classic G1 figures that have inspired them.


Continuing with the idea that Series Two being an upgrade to Series One is that they are just slightly larger. For people wishing to add to their already current collection you might be disappointed in that fact, Having them side by side, I cannot line and say I am not disappointed that Thrust does not match up all that well with Thundercracker and Starscream but yet it is those differences make me glad they selected the Coneheads over Skywarp.

Well I brought it up so why not talk about Thrust?  The first improvement you can see is the weapons. The seekers in Series One have a very generic blaster where as Thrust actually comes with null rays on his arms. The post that holds them into the arms needed a dab of glue to hold them in place but in the end that is a small price to pay for the great improvement in the look. Just like in Series One, the figures in Series Two have very sharp paint apps that just scream back to their traditional counterparts. Now to get to the largest and most appreciated upgrade between the two series and that would be the way the wings attached to the back of the figure. Series One had a very flimsy and very tiny peg system. Both Thundercracker and Starscream had an issue where the two tiny pegs would not or could at all fit into the corresponding holes in the back, causing them to bend or snap off. The wings for Thrust use a larger peg to plug those parts into the back, greatly improving ease of installation and stability as well as adding additional details. 

Moving onto Prowl, where I was fortunate enough to have a couple other version of a seeker to compare Thrust to, I shall use the closest representation in Series One being Jazz. Side by side you can once again see the slight size difference and the socket joints. If you look to the paint job you can clearly see the details that were taken direct from original figures to bring the G1 feel out in these figures. Much like the comparison between the seekers the improvements are the same. The door wings on Prowls back attack the same way as the wings on Thrust connect with even the additional moulded on inside car door panels. Like Thrust there is a great weapons upgrade. With the small blaster Jazz has looking like a deformed look of his original blaster where Prowl is equipped with is an almost exact copy of the original G1 and Masterpiece figures. The next improvement would be the handle of these weapons, with a smaller peg placing them into the figures hand is easier, add to that the additional shoulder and wrist movement the figure can easily aim the blaster.


Two down and six to go in Series Two. Will I get more? Now that is a silly question to ask, of course I will. I enjoyed all heartily Series One and Series Two surpassed everything I was expecting considering I was thinking they would have the same build as the first releases. I have had some awesome luck with the first series of blind packs, and for Series Two I am 2 for 2 with one Autobot and one Decepticon. When I do get more I will be posting those photos on my Facebook page so you to have have a closer look. To keep up with my future purchases click the link below and like my page, as well you can follow me on Twitter.

TheRealRonin
Like Transformers Reviews on Facebook

Wednesday, 23 July 2014

Me Grimlock no Bozo, Me get Review.

Funny story happened today, or at leat funny to me. I went to my local Toys r Us looking for a Masterpiece Grimlock. After finding not a single one on the shelves but the SKU Code still there I asked a very helpful associate if by chance there were any in stock. 10 minutes later he told me that there were 4 in stock, so my hunt began! He asked a couple of his other co-workers on where they might be hidden as I kept my eyes peeled for one that might be in a spot it should not be, but after nearly an hour of my looking I had to give up the search and the fight.

During my search, I did grab a couple non Transformer related items and since I was there and I went there for a Grimlock, I will be leaving with a Grimlock! Thankfully to a little known movie called Transformers 4 Age of Extinction that came out, have you heard about this? Well apparently there are Dinobots in this movie along with some other transforming robots. So in keeping with my promise of leaving the store with a Grimlock I added to my growing TF4 collection with Age of Extinction Voyager Class Grimlock.


The figure comes in the new style packaging that were are becoming familiar with the new releases. Standing proud and mighty in robot mode, Grimlock greats you in the large window opening with a picture of Grimlock in accurate movie colours. On the back you have the bio as well as the normal photos in both alt and robot modes. The latest gimmick Hasbro is telling us is that the transfomation only takes 'X' amount of steps and in Grimlock's case that number is 18.
Time for a small rant here. I am not against a simpler transformation if done right, but I feel the math Hasbro uses does not add up. I say that because a figure comes with 2 arms, 2 legs and a few other pieces that might be doubled, but when the count is tallied up they count moving both arms separately as one move, where in my opinion that is two separate actions or steps. To further add to that count, when our figures are displayed sometimes (and I know I do) a mistransform to give them a better pose or look and by doing so we would either add or subtract from the total number of steps taken in the official transformation.

Another little pet peeve of mine comes with the instructions. Most of the newer figures I have gotten my hands on, the instructions have been in reverse. For example we will use Grimlock here. In the package he appears in Robot mode, but the instructions start him off in Dino mode. The first time I completed the transformation I had some great difficulty figuring out how the T Rex head assembled and actually faced forward to the rest of the body. Once you figure out where everything fits, slips through, or under the actual transformation is quite intuitive but I did learned one small tip. When working with the Dino legs or Robot arms, it is best to move them off to the side on the shoulder joint to allow more than enough clearance during rest of the transformation.


Starting in Dino mode you see a very different take on a robotic dinosaur. With all his spikes and amour plating Grimlock looks more like an upgraded battle cat. If you have seen the new movie I can understand your confusion as the colours, as they are no where those in which we saw in the theatres. The paint scheme all though very sharp and applied in the right areas. With a change in the paint barrels I feel that they just starting pumping these out on the same line in which they did the Transformers Prime Predaking on and did not inform the staff. The head is very large compared to the rest of the body, but I do like it. Even with the large teeth, Grimlock's grin makes him look friendly, but that grin does come at a price. There is a gimmick with the lower jaw that when you press a button on the left side of his head, it chomps up and down. I personally would want that gimmick to have a lock so the mouth does not need to be open at all the times. The short stubby arms are on a ball joint and can assume some expressive positions but the chest piece does not clip into anything so they tend to move along with the arms. The legs are fully poseable with joints that work in the hips, knees and feet but for the later you will need to start the transformation to get the feet free and into poses. From the great legs we get to a stubby tail.
Now I do not feel this tail is short or stubby but from certain angles it does give that impression. If you feel the tail is to short you can fix that with weapons storage. The mace that comes with Grimlock can clip on the tails tip adding a ridiculous length and look. At least it will stop you from hitting people in the head with it causing a concussion. 

It is in Robot mode where Grimlock begin to shine. The short tail, large head and nice legs all fit in beautifully and with surprisingly very little alt mode kibble. Why not I get what I feel is a small amount of kibble out of the way and start with the Gorilla arms. You can see the remainder of the Dino feet hanging from the forearms and thankfully the arms and hands are not in their position permanently.
With a slight mistransformation by unpegging the kibble from the forearm and you can freely rotate at the hand at the wrist. Doing this comes in handy when wielding the large mace in Robot mode. The large skull tucks away fairly nicely. The top half splits into two, to become the shoulder pads with what is left over hanging off his back like a hoodie with the hood down.
The head sculpt is different than what we have seen with previous Grimlocks but at the same time familiar. Behind the faceplate you see teeth, something that has been appearing in the latest versions of his head from third party companies. The overall look is of the Dino Knight motif, that is somewhat explained in the movie. All the clues are there from the helmet, amour plating and spiky boots.


The figure has all the standard ball joints in the shoulders and hips with pivot joints in the elbows and knees. There is no waist movement, but there is an ankle tilt. Surprisingly there little movement in the head with it just on a pivot joint considering the majority of figures appear to be connected with a ball jointed neck. Overall is this figure worth full retail? I will say no. With the flood of movie figures that have come out, Grimlock along with his other wave mates will be on sale later in retail if not sooner. Already teased with a SDCC and overseas exclusives, the G1 repaints are right around the corner. If you are a completionist like myself, Grimlock will stand proud along with the other Dinobots that have been released as they all share the knight look and would look good standing guard on your display shelf separate from the latest line of movie figures, but if you have patience I say wait for the sales, or the G1 repaints that will soon follow. I say give Hasbro or Takara another year for those. 

TheRealRonin
Like Transformers Reviews on Facebook

Wednesday, 16 July 2014

Starscream gets his Crown.....and Missiles!

Oh great, yet another Starscream review......haven't you written enough? Well yes, but this one is with a twist. It has less to do with the actual toy or toys but something that is an addition to already two fun toys.

Recently I took the dive and ordered some parts from Shapeways. What I ordered was a weapons pack for Transformers Prime Starscream. as well I ordered a crown for Fall of Cybertron Starscream. Now with this being my first voyage into the world of 3D printing I began the process by researching into the process, the product and it is here I shall share some of my thoughts.

The two kits I purchased were both designed by fakebusker83, so here is a shout out for the work you did! With being my first purchase I went with the safe bet and ordered these parts in White, Strong and Flexible. In my research I found that these parts while strong will arrive with a rough or sandy texture, so some prep work will be required. Once ordered they arrived in about two weeks, with one week to be printed (an odd way to call it) as their order portal shows you the process. They arrived in a box larger than I thought and once opened I see two bubble wrapped rolls. Once unrolled two individual zip lock bags were inside with the parts I order and phew they all arrived in one piece.

As I am inspecting these parts for the first time, and I was surprised that the rough texture was not as "rough" as I thought it would be. Now don't get me wrong, the parts do require some clean up but as as much as I suspected. The first step will need to be to wash off the dust created during the process. A simple dunk inside warm water and dish soap and a gentle rub I was able to remove the dust. Switching to clean, warm water, I washed off the soap residue that might have been left behind and placed the parts out to dry. It is this drying process that I first came across the porous nature of the material. Within the first hour after being washed the parts felt dry to the touch, but not completely. The surface was dry but the parts felt bloated. It was very evident that the material adsorbed quite a bit of water, so I allowed them to air dry for an entire day.

The next day the parts were feeling the way they were when removed from the zip lock bags but of course less dusty. Now began the process on assisting with the removing the roughness of the parts. This step should not be rushed and if all possible done by hand. Now I will admit I have not tried but using any form of a powered tool may cause damage that can be easily avoided. With a quick visit to a local hardware store I grabbed myself a sheet of 600 grit sandpaper. I have used this grit before in model building and I find the versatility of working both dry and wet comes in handy. The crown came by itself, but the missiles packs came attached together, so with gentle pressure with an x-acto knife I separated the pieces.

Starting slowly as I have never dealt with the material before, I began to sand the pieces. As I work on them I find the layer of roughness is only on the surface and so the pieces are getting smoother quicker than I had anticipated. The crown itself needed more attention as I was concern with retaining the details, but with keeping a watchful eye I was able to maintain them. There were some parts that required my trusty hobby knife again, to "dig out" any of the built up material in the edges and ridges. Once I felt I worked my way down to the base model, I used a new piece of 600 grit and dampened it slightly. Going over the parts one more time I finished them off with more of a polished sanding.

After one more dunk in water to remove any remaining dust from the sanding process and a full day to dry, next came painting. In my town there is a local hobby shop that specializes in miniature figures as I figured they were they were the best resource to ask further questions. The Shapeways store itself has quite a few table top game figures, so why not? They recommended to use a Water Based paint because of the overall porous material. With that suggestion I looked to match the colours I required. Going back to my days working in model shops, painting and building model kits I already knew some of the basic. The first being is to make sure your brushes, no matter how cheap of expensive they might be is to make sure that all loose hairs are removed. The next few steps are pretty self explanatory, gather all your materials needed, brushes, water, paints and make sure you are wearing clothes that you don't care if you ruin as accidents can happen. Now once the paints are mixed, shaken or stirred, when applying directly to the brush do not glop on the paint, the less paint the better. You can always go back for more. Utilizing another trick I learned, paper clips are a great tool for holding small parts, if unbent correctly you can apply just enough pressure to hold the part to avoid finger prints and an easier way to manoeuvre the pieces.

Now that you have the basics the rest really only comes with experience to which thankfully I have. The main trick to remember when hand painting any model part is to look at your piece and choose in which direction you will apply the paint. The real trick is to run the brush in one direction when at all possible, doing so eliminates brush stokes and applies each coat evenly. With a light amount of paint on my brush I started to apply the first coat. Due to the prep work I took with these pieces the paint application went smoothly and much to my surprise that it did not soak in as much as I thought it would. The missiles have 3 different colours that needed to be applied, while the crown has only two, but between each colour I allowed all parts to fully dry. The water based paint dried very quickly with the expected matte finish. For the red on the missile warheads and the jewels on the crown I use a oil based paint I had from my G1 Starscream Restoration that was perfect for those parts. If you are going to mix water and oil based paints a word of caution. Yes, it can be done, but make sure it is Oil on top of Water not the other way around as you may have a possible disastrous outcome. The missiles had a detail separating the warhead from the body, but I was not so lucky with the crown, so I had used the gold paint as a base coat or primer for the red jewels.


Once all the touch ups were completed, I set the pieces aside to dry. In my opinion this is the worse part of model painting as they are all completed but you should not touch. I have been testing fitting the parts all throughout the sanding process, but now that they have a coat of paint I wanted to see the fruits of my labours. After waiting impatiently for a day the time had come to places the pieces on their respective figures.

First I will start with FoC Starscream. When the crown is attached it will need to be removed before any transformations, but it really helps set him aside from his mould mates, Thundercracker and Skywarp. I wished I had some clear finish to spray on the crown to add some shine and gloss, but for such a small part it can wait till I borrow some. The crown is very well designed as it fits of the head beautifully. It clips in to the back of the head and yet can be easily removed for transformation.

Moving on to Transformers Prime Starscream, he now has screen accurate single missiles, versus the rubber cluster pack. Now if you are a fan of the cluster pack, the weapons kit does include them along with replacement head and knee spikes. I am in no rush to replace those parts, as the soft rubber works for me, but those clusters just had to go!

Fitting in the same ports as the originals, they easily slip on and like the crown can be removed for transformation. The posts on the forearms later become part of the rear tail section but there are matching ports under the wings. Now this is where you need to be careful as the wing posts seem to be just slightly bigger than those on the forearms.
When placing them under the wings, apply the pressure directly above the post and missile. Anywhere may cause warping or even worse cause the part to break. I guess that is score one for the useless rubber pods because they flex to the posts easier. Unlike the crown I will not be applying any clear coats to the missiles. To keep with the screen accurate look of a matte finish fins, bracket and body of the missile, while the warhead tends to be glossy, to which was accomplished with the oil based paint.


For my first ever purchase on Shapeways, I will say I am quite impressed and all my preconceived notions were quickly quieted once I began to work with the material. If you are planning to get some parts for yourself, you will need to consider what material you wish to work with. WS&F is the cheaper and strongest material they offer, but it does dilute some of the details and does require quite a bit of prep work. Other materials like Polished come in a variety of colours and eliminate the majority of the prep work, but that comes at a slightly higher price. The Detailed material is by far for capturing details the best to choose, but the costs can add up and the material has a rubbery, or as some of the information I read can be slightly more brittle in nature.

I have shared just some of my experiences with my first ever walk into the future. There is another piece that I have been eyeing for a bit, and if I do order it, I will either select the Polished material, or even take the full on plunge and go with the Detailed material. I bet you can guess which piece if you have had a look at fakebusker83's page, and the one photo I have added on what piece I will be look into getting. If you have a guess, leave a comment below and see if you are correct. 

Also a shout out to the boys at Transmissions Podcast in helping with the final pieces in my research and learning of 3D Printed parts as well the folks and puppy at Imperial Hobbies for leading me in the right direction for paint. All your efforts are greatly appreciated and I thank-you.

 
TheRealRonin
Like Transformers Reviews on Facebook

Wednesday, 25 June 2014

So....How big is the broad side of this barn?

Hello Transformer fans this review is inspired by a recent online order to Shapeways. Now this review is not what I purchased, I shall leave for a later but it is an add on of another kind. I am no stranger to add on kits or accessories, if you recall my review of FoC Ultra Magnus with the KFC KP-01UM kit. I have a few others that I could mention but this is not why were here.

This review is for Make Toys add on for their version of IDW's Swerve named Trash-Talk, but with the Hasbro release of an official Legand's Class Swerve I figured, why not?


The blaster comes in a nondescript brown box. The front with a simple line drawing and on the back the assembly instructions. Opening the box you quickly find out this is a model kit coming in on 4 different sprues. This kit has no real instructions outside of the pictures but I did read that no glue would be required.Once I started piecing the parts together that statement could not be any more accurate. All the parts fit well with each other and snuggly. Now in the end there were couple of pieces I did end up gluing together but that is no real fault of the kit. The piece that sits on top of the barrel I felt needed a touch of glue just to hold it in place better The second part I needed to glue was my fault. One of the six coloured bulbs near the rear of the blaster, I had accidentally trim down the stem slightly too much and in doing so that piece never fully sits in the corresponding port causing it to fall out.

The blaster is a awesome representation of the version given to Swerve in the IDW comic book series. The main body has painted pieces as well as a tampographed "My First Blaster" on the side. Once all pieced together I could not wait to have Swerve hold it and oh no, it fits loose in his hand. On further research I find that Trash-Talk has 4mm hands, while Hasbro has their traditional 5mm. How did I fix that problem? I did what any great handy man would do and reached for a roll of Duct Tape! Cutting a piece of duct tape the same length of the 4mm handle. I started to wrap the handle and sadly I cannot recall how many times around but I was able to make up the 1mm difference.

With a touch of glue and tape Swerve has a handy little weapon to wield while Flanker is off flying on a mission of his own, or Swerve can go all gangster while attempting to blow away Decepticons with dual blasters.....that is if he actually hits anything.


Friday, 20 June 2014

Orange is the New Scoop

I know, I know.....it has been awhile since I have sat down and wrote a review and yet I have a great excuse. If you follow my Facebook page you have been given a Pictorial Preview/Review of a little restoration project I have started. Once this little project is over I will be completing a full write up on the process. In the meantime another thing most reviewers do is look, listen and read other reviewers post anywhere and everywhere. One thing I have been seeing with the new releases of toys hitting the store shelves for the upcoming Transformers Age of Extinction movie that are screaming for reviews and opinions.

The one major item that seems to accompany the new toys is their simpler transformations. You can see it on the package advertising X amount of steps and some you can flip and change and there seems to be a running theme. Collector's are beginning to whine and moan about the simplified  transformations and quite frankly I am tired of hearing it. These are toys meant to be enjoyed by children, they are not Masterpiece figures. If we as adults find enjoyment in a toy, why should we complain when they are made for children.

I could go on forever on but I am choosing to take the high road and only leave you with this one thought. The majority of collectors were once fans of the G1 and other toy lines as children and yes as we grow older we request, if not demand that our toys become as complicated as our lives have gotten. To that I ask why? Will I be purchasing any of the simplified Transformers?  Chances are No and the reason why is because they do not interest me. If that is your opinion as well than you save yourself some money.

Now that I have that little rant out of the way I am personally glad to see a Transformer that brings back the feeling of a G1 toy with modern construction. This feeling is found in the Deluxe Class Generations Autobot Scoop. Scoop is perhaps the most simplistic Transformer I have come across in the Generations line and that is not a bad thing in the least. As a matter of fact while transforming him I am reminded of the original G1 toys I had as a child. The head gets hidden, the fists flip in and the legs flip up and over. Granted the arms and chest have additional steps that where never seen in releases 30 years ago but that is where the modern engineering comes into play.

We are going to start with the packaging. Scoop is displayed in his Robot Mode with his two buddies in their Robot Modes. I ordered this guy from (along with some others) from Big Bad Toy Store so I was fortunate enough to get the American release with the IDW "Spotlight" comic. Now unlike other issues, a quick look into the comic I do not even see Scoop in this issue or even in the background. If you are missing Issue #23 of the Dark Cybertron series Chapter 2, why not pick up Scoop for the alternate cover? Looking to the back of the package it has the traditional product shots and bio that we have all come to expect from the IDW/Generations releases.

Looking at Scoop in Robot Mode, you notice the striking amount of orange, with yellow hands and thighs. The big wheels on the shoulders would make any football lineman jealous. Much like the majority of the recent releases the paint apps are sparse but they are applied in the right areas. The head sculpt is perfect for Scoop's alt mode yet the light piping is somewhat limited by arms that hold the bucket in place. Unlike 30 year old toys, Scoop is not a brick. He has a great range of poseibility with ball joints and swivels where you would expect them. The fists only swivel in and out and the large feet do not have any tilts but there is the addition of a waist swivel. The rear of the legs are hollow and the large tires just hanging off them but they have used this space wisely. There are moulded in details on the inside instead of just wasted plain panels.


Scoop does not come alone. He is partnered with a pair of Target Masters, Holepunch and Caliburst. Now short of the ball jointed shoulders Scoop's Target Master buddies have the same look, transformation and poseibility that we have become familiar with. Caliburst colours match his larger partner with the yellows and orange. Holepunch is the one that seems to clash with the overall look being mainly blue and when compared to his other two friends. With the Target Masters in their Gun Modes, Scoop can easily hold both via the 5mm pegs that tuck away between their legs (insert a penis joke or two here) but they do have one more little secret.
The two Target Masters can combine into a single larger baster.The official transformation has Holepunch pegged into the top of Caliburst but you can easily swap out their positions following the same instructions.

As I stated the transformation from Robot Mode to Alt Mode is fairly simple. I have already given you a simplified version of the steps but I have included scans of the instructions that came with Scoop for this review. In Alt Mode all the pieces peg together quite easily giving Scoop a solid feel in his bulldozer mode. The large wheels roll freely allowing to vehicle a nice range of movement that would put any Hot Wheels car to shame.


The bucket is fully articulated and can assume any real world poses. The only real issue is that it is attached to the drivers section canopy. When manoeuvring the bucket into position the canopy has a tendency to pop up exposing Scoop's head. There are very few paint apps in Alt Mode, which is an odd thing considering the majority of Generation figures I have seen most of their paint apps are for Alt Mode. Now the majority of the paint budget was spent painting the canopy from the clear plastic it was moulded in just to match the orange of the bulldozer.


There are multiple 5mm peg holes that are intended for weapons storage, but none of the 6 available ports fit Scoop's Target Master buddies all that well.

 So for just about everyone's whining about simplified Transformers that are being released and the feeling that Hasbro and Takara are taking a couple of steps back, I give you Scoop as my argument against. I feel they have always made simple figures mixed in with the complicated ones. I see Scoop and his Target Master buddies as the natural evolution of a toy line that spans 30 plus years. A strong Robot Mode and a decent Alt Mode make Scoop a great addition to your shelf. Pairing him with Holepuch and Caliburst in their Gun Modes in either hands, combined or standing next to Scoop in their Robot Mode adds extra value to your buck. And besides how kick ass would it be to have a dozer with dual blasters keeping Decepticons at bay on your shelves?


TheRealRonin
Like Transformers Reviews on Facebook