Showing posts with label Deluxe Class. Show all posts

Wednesday, 22 October 2014

Don't call me Fat you Clutch Munching Piston Licker!

There comes a time when a toy looks interesting enough to pick up but there is that little voice that says, not now it can wait for a sale. Well I will say I'm glad that I picked this one up cheap as I feel he is only worth the $5 I paid for him. Without any further delay I present to you Transformers Generations Deluxe Class Tankor.

To say this figure is a disappointment is not what I felt when I first held him in hand. I knew with my own research what the potential I would receive but to have any little doubts removed about Tankor and more or less confirmed is what disappointed me. *Spoilers* The Beast Wars that turned into Beast Machines, we saw Rhinox's spark stolen and placed in the vehicon named Tankor. With an awesome release of Voyager scale Rhinox I knew a Deluxe figure would pale in comparison size wise but before I go bashing this figure any further I should start with what I do enjoy.


Starting with bot mode the overall look is ripped directly from the CGI model from Beast Machines, something that was needed over the original incarnation of Beasties Tankor. The paint applications are sharp and they pull in the right amount of detailing, from the stripes on the shoulder pads, the missiles on the chest picked out, the silver mouth plate and the yellow lights on the sides of the head. The arms convey a lot of emotion with their double jointed elbows, upper bicep swivel with a matching forearm swivel. That combination of joints allow you to pose claw hands in countless number of position.

Those expressive arms do their best to make up for the lack of articulation in the rest of the figure. Now don't get me wrong, this is no G1 brick as all the traditional joints found in today's Deluxe figures and yet those joints are lost due to the nature of making an almost complete screen accurate toy. The legs have hips joints that move in, out and up and down, an upper thigh swivel, a decent knee bend and the feet do pivot back and forth. It is those feet that limit the actual poses you can manipulate Tankor into. I have tried a dozen or so attempts but with each try Tankor appears to be an ungraceful figure skater. If you ever watch the TV show, Tankor just rolled around on his large tank tread feet so there is no real loss there.

The head sculpt is right on the money but in the show the face had more possible poseibility versus this toy. The extent of the movement is left and right and if that weren't enough, it is further limited by the shoulders. The head can do a full 360 but it hops and jumps all over the raised sections from the collar bone area. Adding to the block feel is the lack of waist articulation but in fairness the transformation prevents even the idea of even engineering one. Thankfully the waist and chest piece do their best to cover up what is perhaps the largest gap I have ever personally seen in a modem day Transformer.
The cannon over the right shoulder adds to almost spot on representation of the Beast Machines model but it is severely lacking in details. With the almost spot on paint details I doubt even a company like Reprolabels will produce a kit to add what is missing. The lack of poseibility continues into that cannon. It clips in just behind the shoulder on a C Clip and being on a long solid pivoting arm, it freely moves up, forward and back. That pivoting arm in bot mode only looks good in the over the shoulder or resting on the back but due to the lack of a swivel joint allowing side to side motion, this friction blaster just sits there like the chunk of plastic that it is.

Transformation is fairly simple and intuitive. Everything pegs in quite nicely in robot mode and that continues into alt mode. Start with moving the cannon up and back out of the way, straighten out the arms and using the double jointed elbows bend the arms up so the forearms are flush with the biceps. Next you want to unpeg the shoulders from the back and move that and the chest assembly forward. Bend the feet down and flip down the covers over the treads. Move the legs off to the side using the waist joint and complete the flip down of the chest section on the double jointed hinge. Move the legs back into position, pegging them into the former crotch piece. Take the folded up arms and flip them inwards and make sure the shoulder pads are under the collar bone section of the head assembly. Next tab in the head into the pegs that are present on the forearms, move the cannon into position and you are done.

Much like with bot mode I will start with what I like in alt mode. Are you ready for the list? Are you sitting comfortably? Have your favourite snack or drink handy? Good, well here it is. It rolls nice.


OK, now that I've got that out of the way lets have a closer look at Tankor in well, his tank mode. First thing is first, he suffers from visible everything! You can clearly see his head, hands and chest. Now I know what you are going to say and that is, well you saw his head in the CGI cartoon so why should a screen accurate toy be any different? To that I have no argument, but when reviewing the on screen look of Tankor the rest of what I mention seems to have been blended into other parts of the CGI model. From the looks of the design you could be confused with this being a one step changer and the transformation would just be to stand him up and you're done. The flaps that covered the shins, now expose a large gap behind the forward treads, while the arms now fill in that chest gap I mentioned earlier.

While I do feel they got the portions for the length as close to accurate it is the width that leaves something to be desired for. While in this mode no one will call him 'Fat' Tankor. Looking straight down the front you cannot help but see how skinny this tank is when compared the height and length. Without anything hidden the paint apps that were wonderful in assisting the look of this toy in bot mode continue into alt mode but a feel the grey plastic that was used could have been a shade or two darker. 

It has been awhile since a figure has not impressed me and sadly I know I am not the only one that feels this. With the awesome releases of Beast Wars Rhnox, Waspinater and Rat Trap a part of me was hoping for updated versions of the Beast Machine vehicons. With this first offering anything else will just not line up in scale in either mode. If this designed shared the same scale as his beast mode counterpart this may have tipped the scale more in favour. We may have received more articulation in the head, the cannon as well additional girth allowing for a more in scale look with Thrust and Jetstorm, but those dreams like this toy will fall flat.


Now there is room for improvement. The cannon that just clips on with a C Clip could be replaced with a third party or 3D printed offering. There is no need for it to spin as it does in the CGI cartoon, but added side to side movement and perhaps the addition of the Key to Vector Sigma, but for now I will work with the IDW inspired cannon.
I will add this. If there is a artist out there that currently does 3D printing and you require a Tankor for measurements to produce a new cannon I will be more than willing to lend you my figure so you can begin your work. All I ask for in return is of course the figure returned (no rush) and a version of the cannon you have designed. I'm just putting that out there. For now I shall pose those wonderful arms in a head scratching pose, place Tankor at the back of my shelf, as he sits and wonders what a great toy he could have been if they started by making him Voyager scale.

TheRealRonin
Like Transformers Reviews on Facebook

Wednesday, 24 September 2014

Transformers Generations Windblade. The 30 in 30 out of 30 for the Thrilling 30!

What do fans want most? The was a question Hasbro asked Transformers fans to begin the kick off for the Thrilling Thirty. Once voting was completed and tabulated, I believe we received a combination that I can say was not expecting. For starters we get an Autobot but no real surprise there. The alt mode is not a car but a plane to which we know is rare for an Autobot. Now I cannot recall all the questions that were asked but I belive but gender and weapon were asked. To which the answer a sword and the most surprising is a Fembot.

Once the basics were answered it was time to hand the results to the great folks at IDW Publishing to add life to a character to what would later became a four part mini series. Now this review is not about the mini series but what that series was inspired by. That is the toy that was created by the fans. I present to you Deluxe Class Windblade.

I am not going lie but once I saw the first mock ups of Windblade I was excited. As time passed and more photos began to appear my excitement grew. Then later came the release of Windblade #1 through #4 from IDW and I knew that I just had to have this toy. Being in Canada I have gotten use to waiting longer than we should for releases, but with a single tweet I knew what I had to do. I sent a text message to a friend on the floor at the Toronto Fan Expo to swing past the Hasbro booth and pick up my very own Wingblade.


Two days later I had her in my hands and I could not wait till open the package. I felt like Charlie Bucket and I knew my golden ticket was inside. Now with this being the official Hasbro Canadian release there was no packed in comic as with other releases of the Generations toy line. The comic that will be packed in should be Windblade's first appearance in Dark Cybertron chapter 8, sadly I don't have that one.

After handling the figure a few times going from robot to jet mode and back, I am happy that we have received a completely new figure as everything feels new with Windblade and no "stolen" engineering from other toys. Now with saying that, I am going to start with my impressions with what I feel is the poorer of the two modes, that is Jet Mode. Yes we have seen and heard all the complaints about jetformers, so I am not going to rehash the old complaints but I will list flaws that appear with this particular figure. The first real glaring fault I find are the feet on the rear of the jet. They do not fold down or away creating a blemish in the tail section that even my imagination can't come up for a reason for being there. 
Now between those feet is a gap and a very noticeable one and hard to forget once seen. The weapon can be stored underneath to which does help with filling in the gap, but you will lose one of the pleasant surprise of Windblade in VTOL Mode, more on that later. The handle of the weapon does stick out further than the exhaust, but the added addition of the fan blade in the handle adds to the appearance of a directional fan for the VTOL mode (See I told you I have an imagination)
On the underside you have your very traditional robot junk tucked and folded away, but being a jetformer no surprises there. The one disappointment is the rear landing gears. They are well detailed but perhaps too detailed. I know space would prevent folding struts, but their size become apparent in robot mode. What I think should have been done is to give them a slightly lower profile so when the front gear is down it will give the impression of take off when laying on a flat surface. One last thing and honestly this is not a complaint but an observation, the cockpit canopy does not open. To me that is not a make or break deal but for others it might be.

OK, I have gone on long enough about the bad, lets get to what makes this VTOL great. the overall design screams a plane that we have not seen in the Transformers universe, and I am even including Thrust. The dark colour scheme we are use to seeing on Decepticon jets works on Windblade, maybe it is the red or the white nose cone but you just know this is an Autobot. The highlights of the yellow canopy does not take away from the off white rotor blades of the VTOL parts on this jet. The blades do rotate within the cowlings quite easily with your finger but will take more than lung power to get them rotating on their own. If you have read the comics, you know that those blade were rotated not only for take off but also for flight and in this figure you can emulate this.The cowlings do pivot to allow some dynamic poses never seen before in wings. Straight on down the white nose of the jet, the robot parts tuck away just enough to add the illusion of intakes for the dual jet engines. The front landing gear as I mentioned does retract to aide in the next little surprise. The port that stores the weapon in alt mode can serve as a port for an action figure stand. Now I do not have one as the majority of my own toys are displayed in robot mode so a qucik little makeshift stand I am able to balance Windblade to emulate the look, but if I ever come across a second Windblade I know my hunt for a real stand will begin.

Transformation from jet to robot is fun, but the same cannot be said about robot to jet. Starting in jet mode once everything is unpegged the transformation seems natural, as the parts flip, slide and move in ways we are familiar with. It is going from robot to jet mode for some odd reason that it doesn't seem to be as cooperative. I have transformed Windblade a few times and I still have gotten the knack of it but it does get easier. The poseibility of the figure is beyond belief for a Hasbro release and unlike recent releases, Windblade seems to have the collector in mind. I will start with the restrictions in movement, the head is on a swivel joint and the only real up and down movement comes from the transformation joint and the collar hinders the side to side movement. The feet are static and the heel piece can cause more issues with standing Windblade than what is is designed to prevent. Nothing fully pegs in and the majority of the joints just friction into place. It is those friction points that will cause extra work when posing this figure. The shoulders are on a mix of a swivel and ball joint followed by an upper bicep swivel, which is awesome to see in a thin arm but every time you move them you will need to readjust the should pads. The elbow has a natural bend with a surprising wrist swivel. Outside the static feet all the traditional movement is in the legs, There is a deep knee bend and ball jointed hips. An added feature missing from most Hasbro releases and due to transformation there is an added waist swivel. The wings tilt up and back allowing for some dynamic and expressive poses.


In robot mode Windblade will be a conversation starter even while standing in your display. The head sculpt stands out above and beyond the rest. There is no light piping but the paint details make up for that minor nitpick. The design is explained in the Windblade mini-series so go out and pick up your copy.


The gold head crest does slide out from behind to be an additional fan weapon but when removed, I feel leaving it in storage is the best place for it. Speaking of weapons, Windblade come packed with a sword and sheath.


The sword is held easily in her hand and with the wrist swivel it adds to the playability and poses. The sheath can also be pegged into the slot on her thigh adding both storage and the aesthetics.

There is one major flaw with this figure in robot mode and that are the heels. When flat footed the heels give a great look but due to transformation they only move towards the foot. That movement can cause issues when standing Windblade, and much like most of this figure the heels do not peg into anything. I feel the lack of pegs can cause issues in the future. On my figure the joints are tight but I have heard word that some figures are coming with lose joints but just how wide spread that issue is uncertain. It is a concern I have if the joints on mine work themselves lose as time goes on.


In short, is the figure for everyone? I would say no. Windblade screams to me as a collector's toy and more so if you enjoyed the Windblade mini series produced by IDW, written by Mairghread Scott and drawn by Sarah Stone as much as I did then this figure is a must have. If you at all on the fence about picking up Windblade and my words have swayed you do not hesitate is grabbing your own as I feel this one will be tough to find once pre-orders and initial releases are grabbed up. I was fortunate enough to get one as I have heard others were not so lucky.

If you are so bold you can win your very own Wingblade. The good folks at the Transmissions Podcast have a contest you can enter. Click on the following link for the details and you will be battling other Transformers fans, including myself, for an awesome Windblade prize pack. All you need to do is follow the directions here and enter. Good Luck. *EDIT* I'm sorry to report that the contest is now closed, if you entered I wish you luck as you will be going up against me. 

TheRealRonin
Like Transformers Reviews on Facebook


Wednesday, 16 July 2014

Starscream gets his Crown.....and Missiles!

Oh great, yet another Starscream review......haven't you written enough? Well yes, but this one is with a twist. It has less to do with the actual toy or toys but something that is an addition to already two fun toys.

Recently I took the dive and ordered some parts from Shapeways. What I ordered was a weapons pack for Transformers Prime Starscream. as well I ordered a crown for Fall of Cybertron Starscream. Now with this being my first voyage into the world of 3D printing I began the process by researching into the process, the product and it is here I shall share some of my thoughts.

The two kits I purchased were both designed by fakebusker83, so here is a shout out for the work you did! With being my first purchase I went with the safe bet and ordered these parts in White, Strong and Flexible. In my research I found that these parts while strong will arrive with a rough or sandy texture, so some prep work will be required. Once ordered they arrived in about two weeks, with one week to be printed (an odd way to call it) as their order portal shows you the process. They arrived in a box larger than I thought and once opened I see two bubble wrapped rolls. Once unrolled two individual zip lock bags were inside with the parts I order and phew they all arrived in one piece.

As I am inspecting these parts for the first time, and I was surprised that the rough texture was not as "rough" as I thought it would be. Now don't get me wrong, the parts do require some clean up but as as much as I suspected. The first step will need to be to wash off the dust created during the process. A simple dunk inside warm water and dish soap and a gentle rub I was able to remove the dust. Switching to clean, warm water, I washed off the soap residue that might have been left behind and placed the parts out to dry. It is this drying process that I first came across the porous nature of the material. Within the first hour after being washed the parts felt dry to the touch, but not completely. The surface was dry but the parts felt bloated. It was very evident that the material adsorbed quite a bit of water, so I allowed them to air dry for an entire day.

The next day the parts were feeling the way they were when removed from the zip lock bags but of course less dusty. Now began the process on assisting with the removing the roughness of the parts. This step should not be rushed and if all possible done by hand. Now I will admit I have not tried but using any form of a powered tool may cause damage that can be easily avoided. With a quick visit to a local hardware store I grabbed myself a sheet of 600 grit sandpaper. I have used this grit before in model building and I find the versatility of working both dry and wet comes in handy. The crown came by itself, but the missiles packs came attached together, so with gentle pressure with an x-acto knife I separated the pieces.

Starting slowly as I have never dealt with the material before, I began to sand the pieces. As I work on them I find the layer of roughness is only on the surface and so the pieces are getting smoother quicker than I had anticipated. The crown itself needed more attention as I was concern with retaining the details, but with keeping a watchful eye I was able to maintain them. There were some parts that required my trusty hobby knife again, to "dig out" any of the built up material in the edges and ridges. Once I felt I worked my way down to the base model, I used a new piece of 600 grit and dampened it slightly. Going over the parts one more time I finished them off with more of a polished sanding.

After one more dunk in water to remove any remaining dust from the sanding process and a full day to dry, next came painting. In my town there is a local hobby shop that specializes in miniature figures as I figured they were they were the best resource to ask further questions. The Shapeways store itself has quite a few table top game figures, so why not? They recommended to use a Water Based paint because of the overall porous material. With that suggestion I looked to match the colours I required. Going back to my days working in model shops, painting and building model kits I already knew some of the basic. The first being is to make sure your brushes, no matter how cheap of expensive they might be is to make sure that all loose hairs are removed. The next few steps are pretty self explanatory, gather all your materials needed, brushes, water, paints and make sure you are wearing clothes that you don't care if you ruin as accidents can happen. Now once the paints are mixed, shaken or stirred, when applying directly to the brush do not glop on the paint, the less paint the better. You can always go back for more. Utilizing another trick I learned, paper clips are a great tool for holding small parts, if unbent correctly you can apply just enough pressure to hold the part to avoid finger prints and an easier way to manoeuvre the pieces.

Now that you have the basics the rest really only comes with experience to which thankfully I have. The main trick to remember when hand painting any model part is to look at your piece and choose in which direction you will apply the paint. The real trick is to run the brush in one direction when at all possible, doing so eliminates brush stokes and applies each coat evenly. With a light amount of paint on my brush I started to apply the first coat. Due to the prep work I took with these pieces the paint application went smoothly and much to my surprise that it did not soak in as much as I thought it would. The missiles have 3 different colours that needed to be applied, while the crown has only two, but between each colour I allowed all parts to fully dry. The water based paint dried very quickly with the expected matte finish. For the red on the missile warheads and the jewels on the crown I use a oil based paint I had from my G1 Starscream Restoration that was perfect for those parts. If you are going to mix water and oil based paints a word of caution. Yes, it can be done, but make sure it is Oil on top of Water not the other way around as you may have a possible disastrous outcome. The missiles had a detail separating the warhead from the body, but I was not so lucky with the crown, so I had used the gold paint as a base coat or primer for the red jewels.


Once all the touch ups were completed, I set the pieces aside to dry. In my opinion this is the worse part of model painting as they are all completed but you should not touch. I have been testing fitting the parts all throughout the sanding process, but now that they have a coat of paint I wanted to see the fruits of my labours. After waiting impatiently for a day the time had come to places the pieces on their respective figures.

First I will start with FoC Starscream. When the crown is attached it will need to be removed before any transformations, but it really helps set him aside from his mould mates, Thundercracker and Skywarp. I wished I had some clear finish to spray on the crown to add some shine and gloss, but for such a small part it can wait till I borrow some. The crown is very well designed as it fits of the head beautifully. It clips in to the back of the head and yet can be easily removed for transformation.

Moving on to Transformers Prime Starscream, he now has screen accurate single missiles, versus the rubber cluster pack. Now if you are a fan of the cluster pack, the weapons kit does include them along with replacement head and knee spikes. I am in no rush to replace those parts, as the soft rubber works for me, but those clusters just had to go!

Fitting in the same ports as the originals, they easily slip on and like the crown can be removed for transformation. The posts on the forearms later become part of the rear tail section but there are matching ports under the wings. Now this is where you need to be careful as the wing posts seem to be just slightly bigger than those on the forearms.
When placing them under the wings, apply the pressure directly above the post and missile. Anywhere may cause warping or even worse cause the part to break. I guess that is score one for the useless rubber pods because they flex to the posts easier. Unlike the crown I will not be applying any clear coats to the missiles. To keep with the screen accurate look of a matte finish fins, bracket and body of the missile, while the warhead tends to be glossy, to which was accomplished with the oil based paint.


For my first ever purchase on Shapeways, I will say I am quite impressed and all my preconceived notions were quickly quieted once I began to work with the material. If you are planning to get some parts for yourself, you will need to consider what material you wish to work with. WS&F is the cheaper and strongest material they offer, but it does dilute some of the details and does require quite a bit of prep work. Other materials like Polished come in a variety of colours and eliminate the majority of the prep work, but that comes at a slightly higher price. The Detailed material is by far for capturing details the best to choose, but the costs can add up and the material has a rubbery, or as some of the information I read can be slightly more brittle in nature.

I have shared just some of my experiences with my first ever walk into the future. There is another piece that I have been eyeing for a bit, and if I do order it, I will either select the Polished material, or even take the full on plunge and go with the Detailed material. I bet you can guess which piece if you have had a look at fakebusker83's page, and the one photo I have added on what piece I will be look into getting. If you have a guess, leave a comment below and see if you are correct. 

Also a shout out to the boys at Transmissions Podcast in helping with the final pieces in my research and learning of 3D Printed parts as well the folks and puppy at Imperial Hobbies for leading me in the right direction for paint. All your efforts are greatly appreciated and I thank-you.

 
TheRealRonin
Like Transformers Reviews on Facebook

Friday, 20 June 2014

Orange is the New Scoop

I know, I know.....it has been awhile since I have sat down and wrote a review and yet I have a great excuse. If you follow my Facebook page you have been given a Pictorial Preview/Review of a little restoration project I have started. Once this little project is over I will be completing a full write up on the process. In the meantime another thing most reviewers do is look, listen and read other reviewers post anywhere and everywhere. One thing I have been seeing with the new releases of toys hitting the store shelves for the upcoming Transformers Age of Extinction movie that are screaming for reviews and opinions.

The one major item that seems to accompany the new toys is their simpler transformations. You can see it on the package advertising X amount of steps and some you can flip and change and there seems to be a running theme. Collector's are beginning to whine and moan about the simplified  transformations and quite frankly I am tired of hearing it. These are toys meant to be enjoyed by children, they are not Masterpiece figures. If we as adults find enjoyment in a toy, why should we complain when they are made for children.

I could go on forever on but I am choosing to take the high road and only leave you with this one thought. The majority of collectors were once fans of the G1 and other toy lines as children and yes as we grow older we request, if not demand that our toys become as complicated as our lives have gotten. To that I ask why? Will I be purchasing any of the simplified Transformers?  Chances are No and the reason why is because they do not interest me. If that is your opinion as well than you save yourself some money.

Now that I have that little rant out of the way I am personally glad to see a Transformer that brings back the feeling of a G1 toy with modern construction. This feeling is found in the Deluxe Class Generations Autobot Scoop. Scoop is perhaps the most simplistic Transformer I have come across in the Generations line and that is not a bad thing in the least. As a matter of fact while transforming him I am reminded of the original G1 toys I had as a child. The head gets hidden, the fists flip in and the legs flip up and over. Granted the arms and chest have additional steps that where never seen in releases 30 years ago but that is where the modern engineering comes into play.

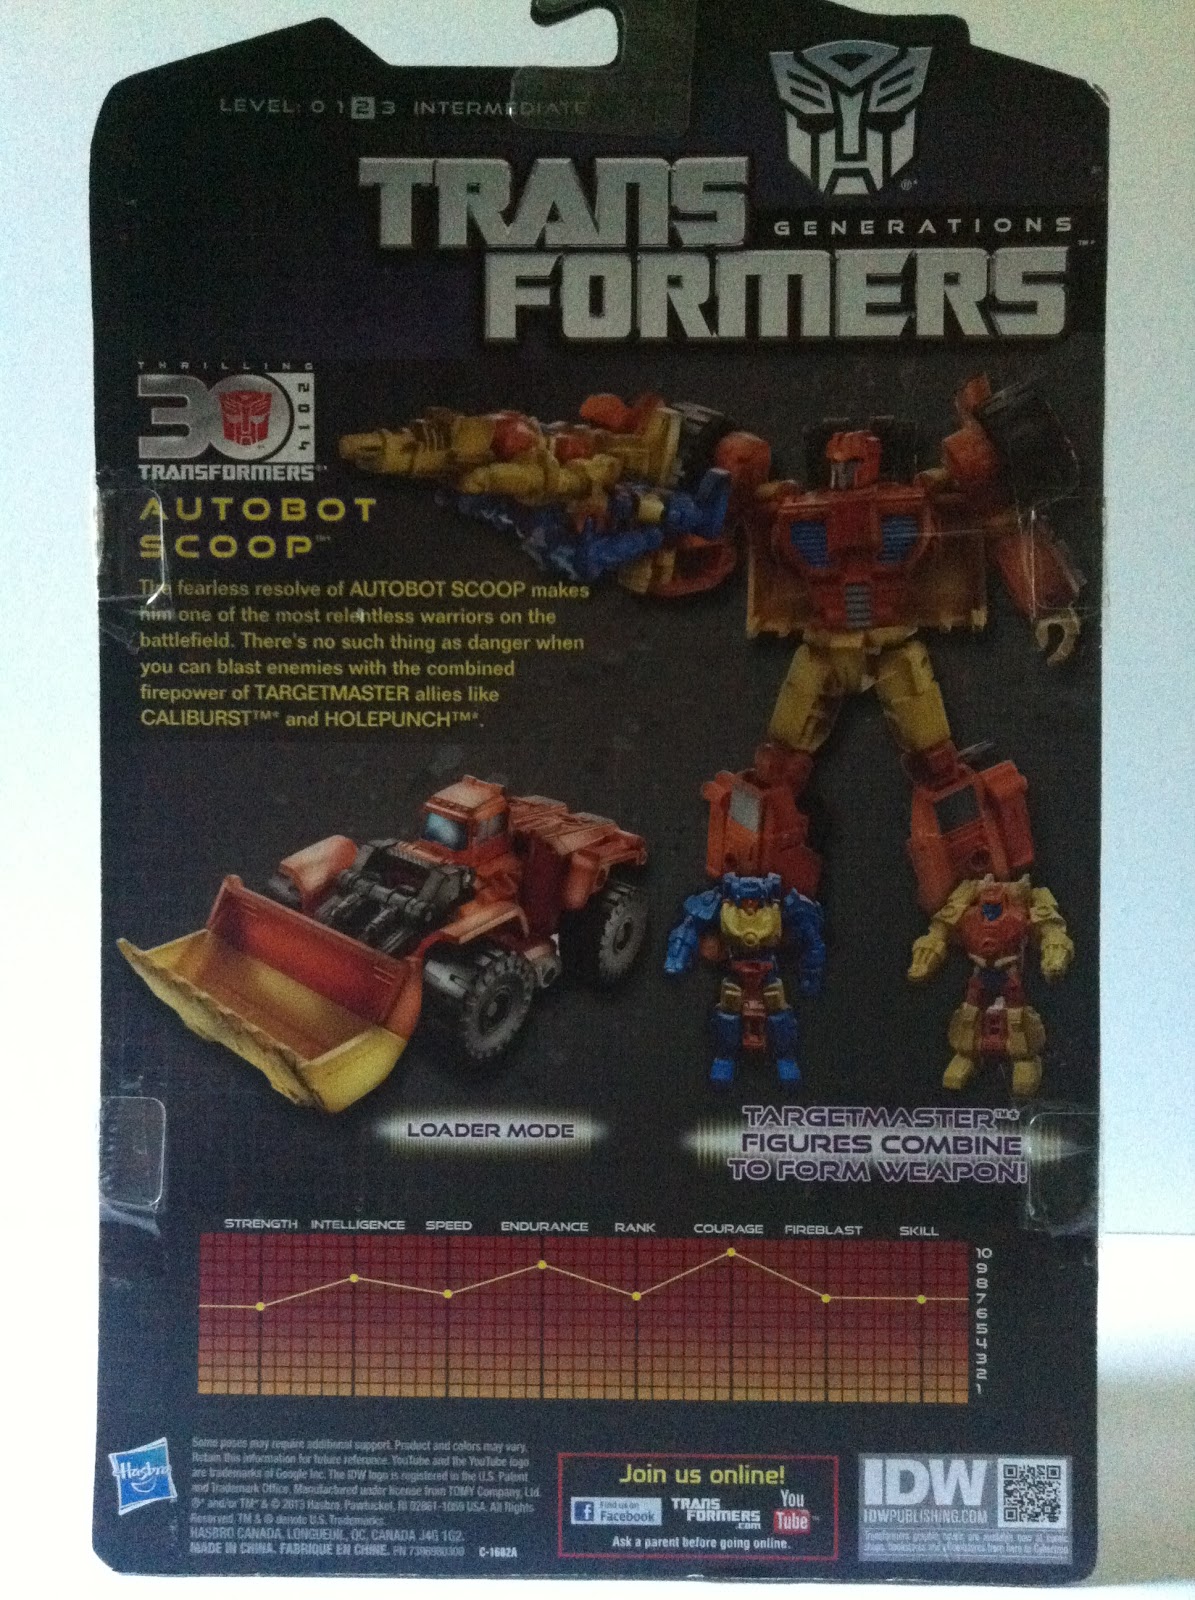
We are going to start with the packaging. Scoop is displayed in his Robot Mode with his two buddies in their Robot Modes. I ordered this guy from (along with some others) from Big Bad Toy Store so I was fortunate enough to get the American release with the IDW "Spotlight" comic. Now unlike other issues, a quick look into the comic I do not even see Scoop in this issue or even in the background. If you are missing Issue #23 of the Dark Cybertron series Chapter 2, why not pick up Scoop for the alternate cover? Looking to the back of the package it has the traditional product shots and bio that we have all come to expect from the IDW/Generations releases.
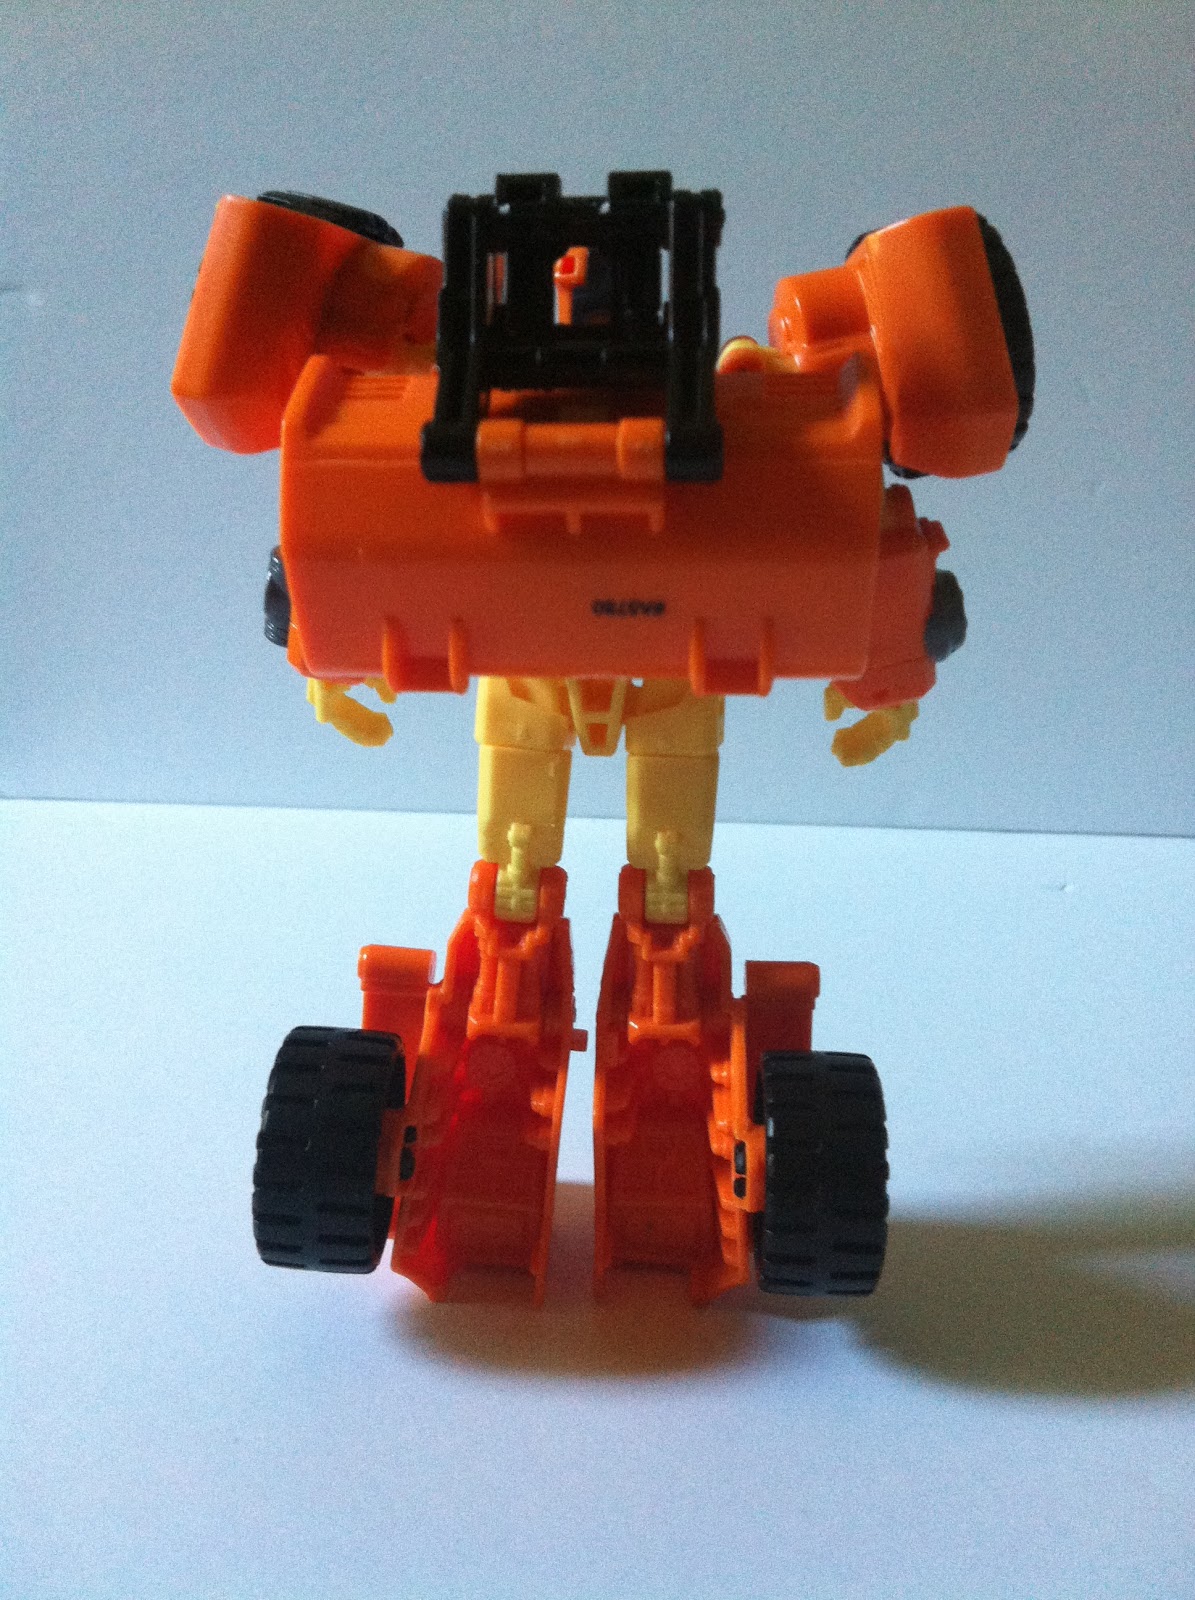
Looking at Scoop in Robot Mode, you notice the striking amount of orange, with yellow hands and thighs. The big wheels on the shoulders would make any football lineman jealous. Much like the majority of the recent releases the paint apps are sparse but they are applied in the right areas. The head sculpt is perfect for Scoop's alt mode yet the light piping is somewhat limited by arms that hold the bucket in place. Unlike 30 year old toys, Scoop is not a brick. He has a great range of poseibility with ball joints and swivels where you would expect them. The fists only swivel in and out and the large feet do not have any tilts but there is the addition of a waist swivel. The rear of the legs are hollow and the large tires just hanging off them but they have used this space wisely. There are moulded in details on the inside instead of just wasted plain panels.


Scoop does not come alone. He is partnered with a pair of Target Masters, Holepunch and Caliburst. Now short of the ball jointed shoulders Scoop's Target Master buddies have the same look, transformation and poseibility that we have become familiar with. Caliburst colours match his larger partner with the yellows and orange. Holepunch is the one that seems to clash with the overall look being mainly blue and when compared to his other two friends. With the Target Masters in their Gun Modes, Scoop can easily hold both via the 5mm pegs that tuck away between their legs (insert a penis joke or two here) but they do have one more little secret.
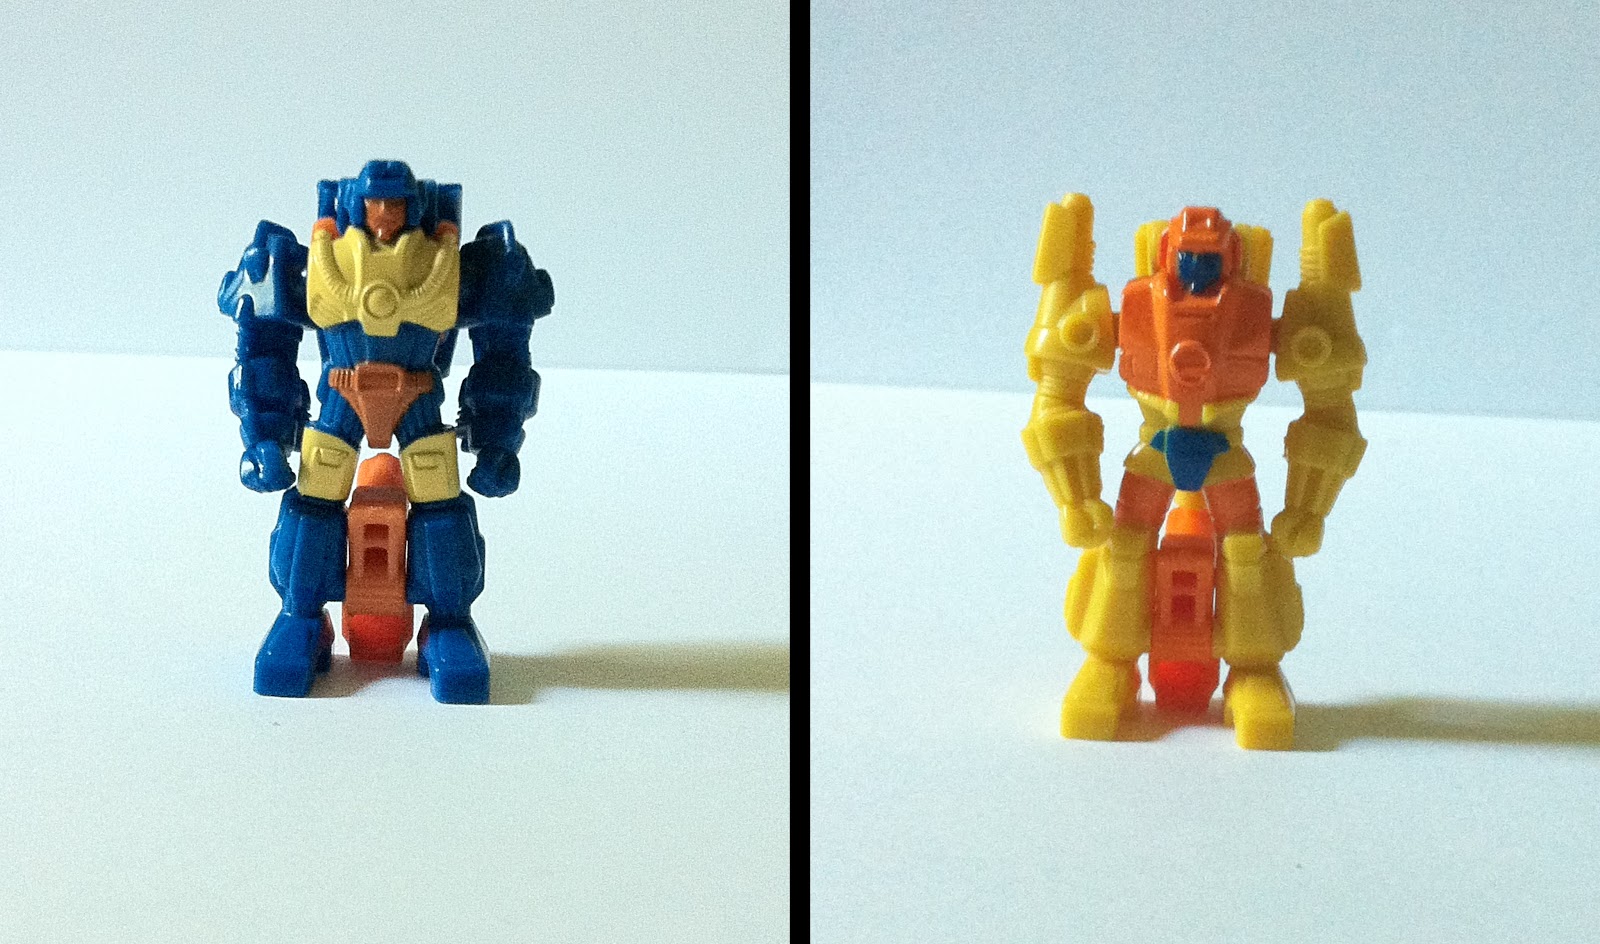
The two Target Masters can combine into a single larger baster.The official transformation has Holepunch pegged into the top of Caliburst but you can easily swap out their positions following the same instructions.

As I stated the transformation from Robot Mode to Alt Mode is fairly simple. I have already given you a simplified version of the steps but I have included scans of the instructions that came with Scoop for this review. In Alt Mode all the pieces peg together quite easily giving Scoop a solid feel in his bulldozer mode. The large wheels roll freely allowing to vehicle a nice range of movement that would put any Hot Wheels car to shame.


The bucket is fully articulated and can assume any real world poses. The only real issue is that it is attached to the drivers section canopy. When manoeuvring the bucket into position the canopy has a tendency to pop up exposing Scoop's head. There are very few paint apps in Alt Mode, which is an odd thing considering the majority of Generation figures I have seen most of their paint apps are for Alt Mode. Now the majority of the paint budget was spent painting the canopy from the clear plastic it was moulded in just to match the orange of the bulldozer.


There are multiple 5mm peg holes that are intended for weapons storage, but none of the 6 available ports fit Scoop's Target Master buddies all that well.

 So for just about everyone's whining about simplified Transformers that are being released and the feeling that Hasbro and Takara are taking a couple of steps back, I give you Scoop as my argument against. I feel they have always made simple figures mixed in with the complicated ones. I see Scoop and his Target Master buddies as the natural evolution of a toy line that spans 30 plus years. A strong Robot Mode and a decent Alt Mode make Scoop a great addition to your shelf. Pairing him with Holepuch and Caliburst in their Gun Modes in either hands, combined or standing next to Scoop in their Robot Mode adds extra value to your buck. And besides how kick ass would it be to have a dozer with dual blasters keeping Decepticons at bay on your shelves?


TheRealRonin
Like Transformers Reviews on Facebook