In my last
review I,well for better lack of a term gushed over my enjoyment of Starscream. So for my latest I shall discuss the toy that got me start to collecting Transformers and bring a small piece of my childhood into my adult(ish) life.
One day while visiting a local dollar store I had just happen to pass through the toy section and mixed in with the various cheap toys and amusement devices I saw something that caught my eye, a bright green dump truck. On closer inspection I saw a additional yellow excavator and blue dosser. I grab the dump truck and to my enjoyment the bright packaging shows what appears to be a combined Devastator. Flipping the bubble pack over, I see black and white instructions to change the truck to a robot. I begin to think to myself, are all 6 in the shelf? If they are do they have all the pieces? So I begin to look on the peg board. I already located the dosser, excavator and I was holding the dump truck, let the hunt begin! I find the concrete mixer and front end loader easily, I am holding all the pieces? I look at the added parts, I see two fists and forearms, a large gun and a plain looking panel, but where is the head? I go digging further, there has to be a missing part.There buried deep in the pegs is a yellow crane and a familiar face looking right at me. There in my hands I have all six members of the Decepticon team known as Devastator, and all for the convenient price of $1 each. So forgetting why I went into the store in the first place and not knowing the Pandora's Box I was about to open, but I had the biggest grin on my face.
I know these figures are not the standard green of G1 release or the yellow of the G2 figures. They of course are missing the Decepticon symbols or may not even be the original moulds, but I did not care. When I returned home I ripped into the bubble packs and laid the parts out in front of me as my inner child was screaming for joy as I began to inspect my haul. Now please forgive me as my memory is not what it use to be, so I do not recall which parts came with what figure so I shall review each one as if it came with those parts originaly.
Not Mixmaster

The cement mixer and right leg of the team is mainly black with a yellow mixing drum with silver paint details and chrome plastic. The stickers on this figure and the others came applied out of the packaging, which is a shame as the one on the drum is not aligned correctly. Unlike the original versions there are no die cast parts, but what do you expect for a buck? The wheels are free rolling and the drum does rotate, just a fun little vehicle. Transformation is very simple, pull the cab forward and tilt up. Take the rear wheels and pop them out followed by......oh wait that's all! In robot mode you have a red chest piece and a sticker on the waist and surprisingly yellow painted eyes. The only articulation is in the shoulders to move the arms up and down.
Not Scrapper

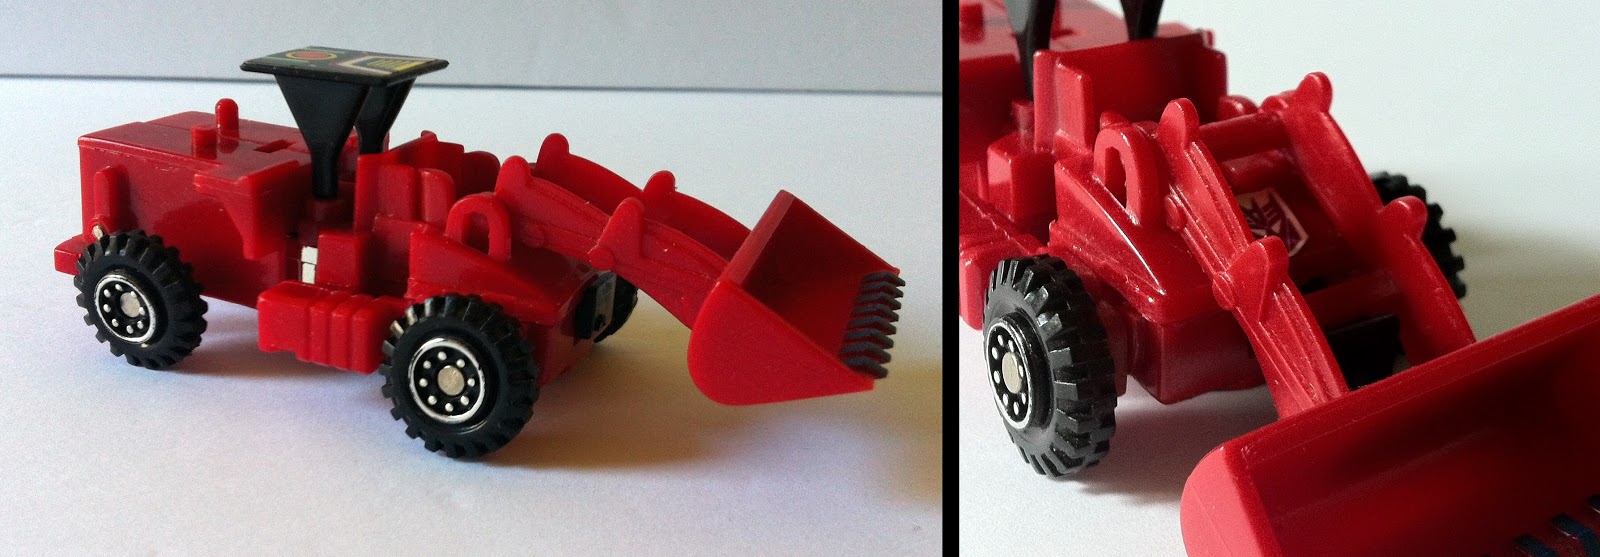
A red front end loader with black wheels and cab cover. The cover has the only sticker application in alt mode. The wheels roll free and the bucket can be raised and lowered. Flipping the rear section over creates the legs and exposes the chrome plastic for the thighs. Pop the head up and position the bucket and arms to complete the transformation into robot mode. Taller in robot mode then his right leg comrade with additional sticker details on his chest. The black head does appear to have a faint application of yellow for the eyes.
Not Long Haul

The truck is mainly green with gold paint details on the hopper, chrome plastic on the underbody and a sticker applied to the hood. The wheels do move freely, but you will not be able to move the hopper without those rear wheels lifting off of the ground. Continue moving the hopper up and over and you have formed the legs, bend the front cab over to form the chest, and move the roof of the cab over to the back. Next you will want to pop the head up and move the arms out followed by the fists. In robot mode you can clearly see further stickers on the inside of the hopper and the surprise of the painted eyes on the face. The short arms do move up and down and due to transformation there is additional movement in the wrists. I call those arms short because if you look at this figure on it's profile, they are not even long enough to reach past the chest.
Not Bonecrusher


This purple bulldozer had some flaws right out of the packaging. The canopy that covers the control area was mismoulded and one of the pegs that hold it in place is not present. There is a sticker on the top of that canopy, as well on the engine cowl. There are no wheels under the solid treads so there is no rolling, but the bucket does move up and down. There is a lot of transforming in such a tiny vehicle, the first thing is to move the treads over to the front via the pivot point under the bucket, slide the front of the treads out and rotate them up to form the feet and legs. Next you want to take the engine cover and rotate them outwards and twist to expose the arms and hands hidden underneath. On the upper shoulder there is another joint so you can bend those arms to a 90 degree angle. The chest looks plan till you move the bucket up on the additional pivot point, moving the open end towards the figure to expose the additional sticker hidden underneath the bucket. Move the canopy back and pop up the head. This head being yellow is perhaps the reason why the eyes are not painted, but the chrome forearms and yellow hands help bring colour. The legs and feet are static in place, but the arms do move in and out as well as up and down.
Not Scavenger

The yellow colour is a reminder to the G2 version, with paint details on the boom and a sticker application on the sides. Much like Not Bonecrusher, the moulded treads have no wheels or moving parts but there are two points of articulation on the boom arm, as well the main bode does rotate. Move the treads over and rotate the feet out, pop the arms out from the sides and flip the head up. We are back to a black head so once again the nice added touch of the painted along with the normal articulation only found in the shoulders. There are no additional paint or sticker applications in robot mode. The chrome piece on the chest adds some extra details but the connection port for combine mode is in a very unfortunate place if it were moved into position.
Not Hook

The final member of the team is a crane made up of purple and yellow plastic with free rolling black wheels. The boom crane can expand with a chrome hook on the end and does pivot up and down. It is placed in a rotating base adding to the play value while in vehicle mode. To begin the transformation, grab the cab section and move it forward as it slides along a surprising little piece of die cast, this frees up the cab pieces as you flip them over to form the feet, now slide the assembly back into the original position. The arms are hidden behind the rear wheels, pop them out and flip up the head, you have the robot fully transformed. There is a sticker applied to the chest and once again the added touch of the painted eyes or visor in this case along with the same articulation in the shoulders.


Now that you have meet the team time to move onto the main show. Not only did my dollar store find nab me all six members there was also some additional parts tucked away inside each bubble pack that look mighty familiar. Just like any other G1 combiner you have many pieces that could be easily lost over time, but without these additional parts you cannot merge and form the first of the combiners, Not Devastator! The one thing I never understood about some collector's is there hatred of partsforming, yes I will admit in a past
review I jumped on that same train but I believe partsforming has a place when done correctly, and making combiner is the best way to apply it. So lets begin.
Not Devastator

Why not start with the legs? After all that is the way it is done in the cartoon. Before I get started it is best to start these transformation into the body parts from their alt modes. Starting with Not Mixmaster, place the cab in foot mode but leave the arms tucked in. Now grab Not Scrapper and move the arms straight up and flip the entire assembly with the bucket facing down. Next you can grab the larger bland looking red piece and tab in the legs into the corresponding parts on the hip assembly.
Onto the torso by first taking Not Long Haul and bend the cab into the same position as in robot mode but now here comes the tricky part. Slide the centre piece that is sticking up from the bland red central piece in between the chrome thighs till it tabs all into place, the hopper section will bend back slightly making it look like it will start leaning forward. Complete the look by taking the red waist cover and tab it into the underside of Not Long Haul.

Now with Not Hook take the front and rear sections and slide them out as those parts will slip on the die cast piece in the centre. Once split turn them 90 degrees so the front cab and rear bumper are facing forward. Take the head piece from the pile of parts and slide it over top of the die cast piece. One last step before placing this part into position, there is a small tab on the right shoulder that you need to swing out, now. On the head piece there is a tab and slot and taking a look on the top of Not Long Haul, the smoke stack looks like a tab and on the top of the cab there is a slot. Place tab to slot, slot to tab and the chest and head are now all connected.

Now take one of the fists and forearms and piece them together. There is another little surprise, the forearms are spring loaded launchers that work quite well and lust like their original versions. Under Not Bonecrusher's there is a peg that the forearm slots into. On the underside of the dosser you will see a small hole that looks like it is waiting for a square peg, the same peg that was swung out before pacing Not Hook on the rest of the combined figure.

With Not Scavenger in alt mode, move the treads out of the way as if you were going to change them into the legs, next take that very unfortunately placed connector and pivot it in place. Build another forearm and hand combo and slot that into the peg available just on the front of Not Scavenger. Unlike Not Bonecrusher this limb connects differently, the connector hooks into an available port on the left side of Not Hook. Now you have a fairly naked combiner, time to dress him up a little. On Not Long Hauls front grill area there is a rectangular hole, the chest armour has a post that slips into this available port. Now on to a personal choice, there is a small weapon that can plug into the side of the head followed by holding the large gun into one of the fists.

Other than it not being an official release, you have a great KO figure. The head sculpt is exactly how I remember with a painted silver face and red eyes, the winged chest amour and the large rifle. With the different shaped limbs this figure always looks to be in a state of motion even while standing still.

For a KO the joints are tight and the figure surprising stays together quite well. Now there are a couple of flaws, I did end up receiving two right hands, so I have the left hand on backwards just to keep the shape. The other flaw is the stickers, the glue used is very weak something that I have forgotten about as Not Devastator stands along with my other combiners and this is the first time I have really handled him in years, to be honest.
Starscream might be my favourite character, but combiners have always been my favourite figures to collect. To add the grandfather of them all even if that figure is a knock off, I am happy to place it along my legitimate releases. Oh and even though it was only seconds for you, it was a few minutes for me, I just went to the
Reprolabels.com and ordered a set of replacement stickers for my Not Devastator. I shall update this entry or create a new entry outlining the removal and application of those new stickers.
TheRealRonin
Like Transformers Reviews on Facebook